10 Home-Buying Costs You Need to Know About

home finance

By: Craig Donofrio

If you’re a first-time home buyer, you might get a little queasy when the last line of your good-faith estimate comes in at several thousand dollars. And after the color returns to your face, you might also be a little more than perplexed by some of those fees.

Knowing what you’re paying for—like these 10 common costs—can ease that check-writing pain.

1. Earnest money

To prove you’re “earnest” in your purchase commitment, expect to plunk down 1% to 2% of the total purchase price as an earnest money deposit. This amount can change depending on market factors. If demand in your area is high, a seller could expect a larger deposit. If the market is cold, a seller could be happy with less than 1%.

Other governing factors like state limitations and rules can cap how much earnest money a seller can ask for.

2. Escrow account

An escrow account is basically a way for your mortgage company to make sure you have enough money to cover related taxes and mortgage insurance. The amount you need to pay varies by location, lender, and loan type. It could cover costs for a few months to a year.

Escrow accounts are common for loans with less than a 20% down payment and mandatory for FHA loans, but it’s not required for VA loans.

3. Origination

The origination fee is a hefty one. It’s the price you pay the loan officer or broker for completing the loan, and it includes underwriting, originating, and processing costs.

The origination fee is a small percentage of the total loan. A typical origination fee is about 1%, but it can vary. Use your good-faith estimate to shop around.
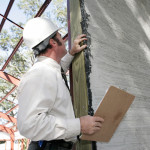
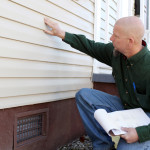
4. Inspection

You want to be assured your new home is structurally sound and free of surprises such as leaks or pests living in the walls. Those assurances come with a price.

  • Home inspection: This is critical for home buyers. A good inspector will be able to notify you of structural problems, flooding issues, and other potentially serious problems. Expect to pay $300 to $500 for a home inspection, although cost varies by location.
  • Radon inspection: An EPA-recommended step, this inspection will determine whether your prospective home has elevated levels of the cancer-causing agent radon. A professional radon inspection can cost several hundred dollars.
  • Pest inspections: Roaches are one thing. Termites are a whole different story. Expect to pay up to $150 for a termite inspection.

5. Attorney

Some states, such as Georgia, require an attorney to be present at closing. In some other areas, this is optional. If you use a lawyer, expect to cover the costs, which vary by area and lawyer.

It’s typical for mortgage companies to have a lawyer on their end, although they should cover the bill.

6. Credit check

Just because you can get your credit report for free doesn’t mean your lender can (and it will actually pull all three). You have to reimburse the lender, usually around $30.

7. Extra insurance

If you live in a hazard-prone area, you might need to purchase extra insurance, like for flood.

8. Appraisal

Your lender won’t loan you money for a home without knowing what its fair market value is. An appraisal will cost $200 to $400, depending on location and property size.

9. Title company

You pay this to the title company to make sure the property’s title is free and clear. Your lender will recommend a title company, but you can also shop around for one.

10. Survey

It’s not required in all instances, but your lender may require a professional surveyor to determine exactly where your property lines are drawn. Prices vary widely, but expect to pay at least $100.

Remember: You have bargaining power. Shop around to get a feel for what rates and fees apply in your area. If you aren’t sure what a lender is charging, ask for an explanation—the charge might not be set in stone. If you’re unhappy with a charge, negotiate.

3 Areas Your Home Inspector Should Check in the Attic

home inspection

By: Patricia Anne Tom

Before purchasing a house, it’s important to hire a home inspector to evaluate the home from bottom to top—including the attic.

This often-overlooked storage space can provide visual cues to potential problems in the safety and structural integrity of a home.

If there is damage present, the inspection can help you determine what to bring into the sale negotiations, including an estimate of repair costs.

Look at these three primary areas when analyzing the attic.

1. Structural Damage

Before closing on a home, the home inspector should examine the attic for structural damage. Damage to the trusses and rafters can indicate that the home has shifted, causing them to crack or break. A substandard level of wood quality, improper construction or incorrect lumber size may have allowed these pieces to deteriorate and could cause the roof to sag and eventually leak.

If there has been fire damage, you should be able to see evidence in black marks from charred or smoke-damaged wood. However, check to see that such damage hasn’t been camouflaged with layers of paint.

Because water usually enters the shell of the home from the roof and not from the sides, you may see water stains if the roof is leaking or has leaked in the past. Signs of moisture also could indicate that ventilation is inadequate.

Inspectors also may be able to see pest damage from termites if they have eaten the wood (or from other rodents that can leave chew marks on wires and insulation or excrement). Rodents like squirrels and rats often enter through the eaves or loose boards.

2. Proper Insulation

An attic must be properly insulated with the required R-level of insulation material for your climate: the colder the climate, the higher R insulation number. Your home inspector will note whether this is up to code, as the code may have changed since the home’s original construction.

An inspector also should be able to tell you whether insulation has been placed properly and in the correct direction, according to the type of batts (sections of insulation backed with heavy paper) or blow-in insulation used.

In addition, attic windows and dormers should be properly insulated and in good condition to prevent outdoor elements from entering into the attic.

3. Chimney and Storage Areas

An attic inspection will show the condition of the exterior of the chimney shaft under the roof. It should be sealed properly where it meets the attic floor and roof. The condition of the bricks and mortar should be solid—not cracked and crumbly.

Although this inspection will not tell you what the interior chimney shaft condition is like, it will give you an idea of the chimney’s exterior structural health.

While the inspector performs the attic inspection, note the condition of storage areas and attic floors, look for damaged floorboards and again look for evidence of water, pest and fire damage.

Crawling into the attic may be uncomfortable, but a proper inspection will help to ensure there are no skeletons in the attic that will haunt the integrity of your future home.

Updated from an earlier version by Philip Commins.

6 Keys to Writing Winning Offers in a Sellers’ Market

writing winning offers

By: Anne Miller for Realtor.com

In a sellers’ market, competition can turn fierce. Standing out becomes a challenge.

In these tight markets, smart strategies can make a big difference. Money helps, of course, but so does some creative and heartfelt communication—and having the right professional in your corner.

Follow these six tips, and you’re going to find success is just around the corner … along with your new house.

1. A good agent

An assertive, experienced REALTOR® will know the market well and will move quickly to present an offer to the seller.

They’ll be able to guide you through options that may seem a little crazy in a slower market—but could prove the difference between success and more house-hunting in a tight one.

2. An earnest deposit

A substantial deposit makes a big difference.

A reasonable deposit will be about 3% of the value of the property. A seller usually takes such an offer seriously and will feel confident you are committed to stand by this offer.

This could give your offer a winning edge. Submitting a pre-approval letter with the deposit puts your bid ahead of the others by showing the seller you have serious intentions.

3. Money talks

Of course, the more cash you can offer up-front can make a difference. too.

If you can afford a 30% or 40% down payment (or more), that may tempt sellers. And, in the long run, it will save you money on a mortgage, shortening the length of your loan and the interest you pay.

Few homeowners are likely to dismiss an all-cash sale. But let’s be honest—that’s a lot of dough that most people don’t have access to.

4. Get personal

Appeal to the seller’s emotions: include a personal letter in the offer to the person selling the property.

Explain why you want to buy the house and what you particularly like about it. Be as specific as possible. Appeal to what you may know of the property history.

Perhaps it’s a historic house the sellers lovingly restored, and you plan to keep it that way—tell them. Maybe you’re looking forward to raising your children in the specific community.

Other offers will appear impersonal in comparison.

5. Speed things up

Offer to close quickly. Most sellers want to make a speedy transaction—they’ll like this.

A standard closing period is about 30 days. If you can close in three weeks instead, this could convince the seller to accept your bid—even over one that offers more money.

Another winning negotiation strategy is to waive some of the contingencies usually included in a standard contract. For example, a winning offer can be one which agrees to shorten the period the buyer has to inspect a property for lead paint contamination.

Before you agree to waive any contingencies, however, you should check with your attorney.

6. Be nice

The sellers want a few more days in the house. Consider giving that to them rent-free.

There’s a few things ideally you’d like them to fix—but if they aren’t deal-breakers, consider letting that go.

Be friendly and personable, because if you prove to be someone they don’t mind dealing with, that could tip things in your favor, too.

Confirm Your Commitment

Ultimately, the question is this: how much do you want a new home?

In a sellers’ market, you’re probably going to have to give more, in many ways.

But hopefully your perseverance will pay off—for your family, and your bank account.

Updated from an earlier version by Wendy Dickstein.

How a Bad Home Inspector Can Jeopardize a Sale

home inspection

Home inspection represents a key piece of the home-buying process –– an expert eye that gives an invaluable assessment of the biggest investment a buyer will make (and that a seller has previously made).

A good home inspector can ease the process and make sure there’s no surprises.

A bad home inspector can jeopardize a sale, hurting both sides of the real estate equation.

Here are a few ways to protect yourself against an unqualified home inspector.

A Note for Sellers

A lot of information about inspections aims at buyers, but they can help sellers.

You may even want to invest in an inspection before you put the home on the market, so you can fix potential issues, adjust the price point, or know what to expect at the negotiating table.

Remember to prep as much as you can to make the inspector’s job easier.

What to Look For

When hiring a home inspector, make sure the person doing the inspection is recommended by a reliable source.

You can consult the Better Business Bureau or the American Society of Home Inspectors (ASHI) to find a professional home inspector in your area. Ask friends and relatives who recently bought for recommendations. Your real estate agent might have someone they trust as well.

Find out what kind of qualifications, education, experience and credentials a potential home inspector has and whether they have a license. Do they engage in continuing education? Ask for references from former clients.

A home inspector should also have insurance, so ask what is covered in their insurance. It could be only the cost of the home inspection—or it might be more.

Request a Sample

A good inspector should provide one if you ask. He or she may offer an inspection checklist, but that doesn’t include enough detail to show what clients can expect in a report.

If the sample report is only a few pages long, this is an indication the prospective home inspector isn’t thorough enough. Some agencies may include a sample report on their website, so you don’t even have to ask.

Also, ask if you may accompany the inspector as he checks out the house. Agencies like HUD and the ASHI encourage this, so a buyer can see the home through expert eyes.

If an inspector balks at this request, it’s a red flag.

Customer Service

Does an inspector pick up the phone when you call, or return calls in a timely manner? Does the company take the time to answer your questions? Your purchase is a huge investment, and you deserve someone who will help you make a wise one.

If issues arise the seller needs to fix, what’s the inspector’s police on re-checking the property? Can you ask questions about the home inspection after they’ve sent you the report?

Good customer service will be a positive recommendation and will enable you to find someone you can trust.

What to Expect

Know what you’re getting for your money.

The average home inspection costs $300 to $500. You get what you pay for, so don’t try to economize on a home inspection.

A so-called bargain might end up costing you more in the long run if they miss “surprises” like foundation issues or electrical problems.

You should receive a report in about 24 hours, with photos, anywhere from 20 to 65 pages.

Based on an earlier version by Wendy Dickstein.

5 Best Ways to Research Your Property History

research property

By: Anne Miller for Realtor.com

Property history research gives you a picture of how the history of your property developed through the years. The history may purely serve to staunch your curiosity.

But you may also learn why some things were built as they were and—potentially—learn more information to help you fix or update your home.

If you’re embarking on a remodel, for example, you’ll need to understand the genesis of your home, how it was built and possibly added on to, and what might lie behind the walls or under the carpeting.

Plus, sometimes it’s just fun to know the provenance of your abode.

Property History Research Methods

Ask your inspector: If you’re buying an older home, check with the expert you’re paying to look at all the nooks and crannies—and about the history of those nooks and crannies. For example, an inspector might note a beautiful hardwood floor beneath modern carpeting or know where to look for a historic foundation stone in the basement.

Talk to your neighbors: Maybe also talk to the previous owner and others who used to live in the area—and their relatives. Many will be happy to share memories. Once land records are accessed, your property history search will yield valuable historical information about the house and its original owners, including when it was sold and to whom.

Visit the library: Old newspapers or local history publications may offer insight into events at your address or give you a sense of the neighborhood and town at the time the home was built. Try to go during a slower time of day—not, say, a raining weekend afternoon—and a librarian may have more time to assist you with this research.

Check the deed: You need to know the legal description of the property, the official address and the subdivision lot number. The legal description also includes the section number, portion of the section, township and range of the property.

Deed transactions are also recorded at local county courthouses in the Register of Deeds. These records may be on microfilm, computerized records or other physical publications. Most staff who work with deeds can help you find what you’re looking for off the address.

When you start your search, begin with the most recent deed transactions and work backward to earlier records.

Scour Porch.com: The online clearance center for home projects, design ideas and contractors also encourages owners and others to note a home’s history. You can check out past work permits, local stats, and who’s done what work on the house.

Other resources: The patent records of the Bureau of Land Management’s General Land office will show you when the federal government first sold the land parcel to a private owner and who that owner was.

You can find other documents online or in local archives or libraries. They include census data records, marriage and death records and insurance maps which show how a property changed over time.

There are commercial sites to help you locate and search online databases to get this information. Genealogical research databases can also give you valuable information to help you uncover your property history.

Happy digging!

Updated from an earlier version by Wendy Dickstein.